In this tutorial, we’ll see how to fix the BlueStacks engine not starting issue using simple methods. Let’s see the steps to solve the engine won’t start problem in the below section.
If you have ever been curious enough to run Android applications over your personal computer or laptop, which runs on Windows or macOS, then you would be aware of Android Emulators.
Android Emulators are useful in running all the Android apps over your computer, which runs over Windows and even macOS. And Android Emulators provide you the flexibility of using your smartphone applications over the big screen, where can you also run them on full display.
And if you are knowledgeable about Android Emulators, then you might also be aware of BlueStacks App Player and Nox App Player. Both of them are user-friendly and good quality Android emulators, which are used by most of the people, all around the globe.
But if you go on the internet, you will find that people have reported some issues with BlueStacks. Their BlueStacks Engine was not starting, and the users reported some technical problems.
Let’s look at the solution.
The Solutions To BlueStacks Engine Not Starting
There are some solutions to stop this issue from occurring.
Method #1: Change To DirectX & RAM Capacity
In this method, and for that, you will have to enter BlueStacks and go to the menu section.
- There, you will have to select the Engine option, and you will find a couple of options.
- From those options, you have to choose DirectX.
- And then you will click the restart now button, which is given at the bottom of the page.
- Now the issue will be solved.
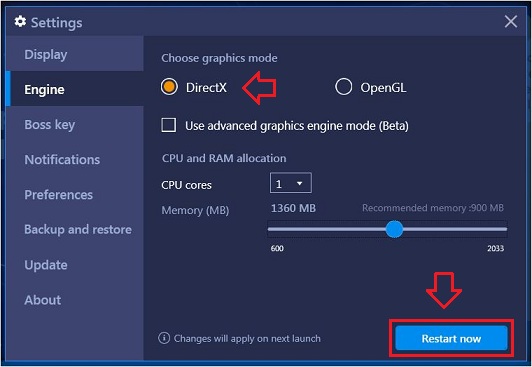
If the issue continued, change the RAM capacity settings and try again by restarting the engine. The problem should get solved.
Method #2: Uninstall & Reinstall BlueStacks Emulator
Then there is another method of solving the issue. This method is a bit easy, and it should work too.
- You can try to uninstall BlueStacks app player and then reinstall it, in order to use it. It is found that without any complicated steps and processes, even merely uninstalling and reinstalling the application helps.
- You can open ‘Run’, on your computer, and then you can initiate the uninstallation process.
- Once you are done with that, you can head towards the reinstallation phase, and for that, you can use BlueStacks uninstaller.
- You will have to allow some things and give permissions before the App player uninstalls.
- Once all of it is done, then you can start the App player, and it will start working correctly.
However, it is also likely that the issue may not be with the BlueStacks App player, but with your operating system.
And therefore, it’s recommended that you should check out the minimum system requirements for running BlueStacks app player on your personal computer or laptop so that you can get to know about it. It’s likely that your system may not be compatible with the app player.
Other than that, you should also free up your RAM, Random Access Memory, so that the app player gets an ample amount of RAM for its activity.
Method #3: Go Back To An Earlier Build
In case, you recently updated to the Windows version, sometimes BlueStacks won’t start. If you wanna go back to the earlier build, you need to do it within ten days of the update. Because the option isn’t available after 10 days.
Let’s see how to get back to an earlier build using the below guidelines:
- Hold Windows key and press I.
- Now tap on the Update & Security option.
- You can click the Recovery option from the left panel.
- In that section, you can find Go back to an earlier build and then tap on the Get Started button. As I mentioned, if you do it after 10 days of the Windows update the option will be turned out to grey color. In my PC, the option is greyed out refer below image.
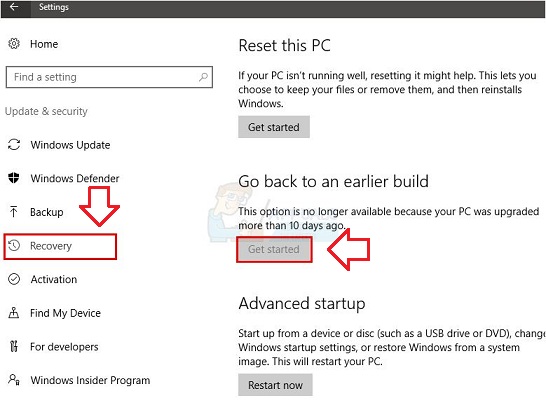
- When you click on the Get Started button, you can go back to your earlier Windows version by following the on-screen instructions.
The last thing that you can do is, disable your antivirus software, temporarily. It has been seen that the antivirus system prohibits the BlueStacks app player and its activity. Therefore, you can check if, BlueStacks starts working, after disabling your antivirus system.
These are some of the steps which should help you in running the BlueStacks app player on your personal computer and laptop. Using the above methods you are able to solve BlueStacks engine not starting problems easily.
Also Read: